Your cart is empty

EXTRA 20% OFF ALL CLEARANCE! PRICES AS MARKED ONLINE  SHOP CLEARANCE
EXTRA 20% OFF ALL CLEARANCE! SHOP CLEARANCE


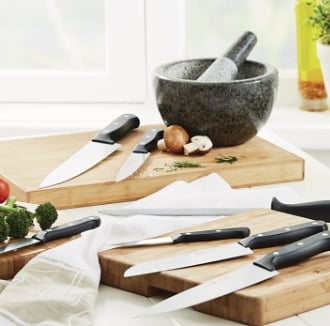
No matter what you like to cook daily, most people use a knife in some form, whether a carving knife, Santoku knife or cheese knife. But what many home cooks perhaps don’t realise, or at least forget about, is that their knives would be much more efficient if they took the time to use a knife sharpener. You don’t need to fork hundreds of dollars on an industrial knife sharpener to sharpen your knives like a pro. You just need to use the proper technique.
At Briscoes, we stock a wide range of knives and knife accessories, including knife blocks and, of course, knife sharpeners. Whether you have the best kitchen knives or some of the lower price kitchen knives in NZ, the sharper they are, the better they’ll perform. In this guide, we’ll go over everything you need to know to sharpen your knives like an expert. Here’s what we’ll cover:
How often should you sharpen your knives?
How to know when you need to sharpen your knife
The difference between sharpening and honing
The range of knife sharpeners at Briscoes
Let’s cut to the chase!
We’re sorry to say it, but there’s no set amount of time when it comes to how regularly you should sharpen your kitchen knives with a knife sharpener. So, unfortunately, you can’t simply put a reminder in your calendar to include it in your regular chores. In saying that, you’ll generally want to sharpen your knives at least once every few weeks. Whether a Japanese kitchen knife, carving knife or chef’s knife, it really comes down to how often you use them and how well you look after them. Professional cooks tend to sharpen their kitchen knives more often or even hire a professional sharpener once every few years (yes, that’s a thing!)
So, if you can’t put a time on how often you should be sharpening your knives, how do you know when to pull out your knife sharpener? Thankfully, there are many signs that will inform you when it’s time for a sharpen. Don’t worry, they’re all really obvious!
When we say smashing food, we don’t so much mean your food explodes in all directions when you cut into it with your blunt knife. Instead, we mean that your knife doesn’t slice cleanly, but smashes cells in your food. Many fantastic recipes require clean and sharp cuts, whether for aesthetics, texture and flavour distribution in a dish. Cutting something soft like a ripe tomato is a great test for this - is your slice clean and sharp, or does the skin of the fruit look a little mushed or dented when you cut it?
Have you ever gone to cut into an onion, only for it to slide down the curve of the vegetable? If you have, chances are your chef’s knife or Santoku knife needs sharpening with a knife sharpener. Whether an onion for a fantastic slow cooker recipe or melon as part of a delightful dessert, a knife sliding can be dangerous and cut your skin.
There are many different knife sharpness tests. Each of them are great for checking how sharp your knife is before accidentally ruining your food. A common test includes:
Paper test
Simply hold a sheet of paper up and try to cut through it with your knife. Whether a carving knife or even a steak knife, it should slice through it easily. Otherwise, it needs a sharpen.
Cutting veggies with a chef’s knife or cheese with a cheese knife shouldn’t be hard work. You shouldn’t work up a sweat, and your elbow certainly shouldn’t be in pain. If it feels like you need to apply too much pressure to use your best kitchen knives, they need probably need a sharpen. Or, you’re not using the right knife to start with.

You’ve probably heard the term ‘honing your skills’, but what about ‘honing your knife’? Knife honing is often confused with knife sharpening. However, the two are vastly different.
Honing
Put simply, honing uses a specific piece of equipment called a honing rod to realign the edge of your knife. Your knife may already be sharp, so honing basically pushes the knife back into alignment to make your knife feel sharper and balanced. Some chefs hone their knives every day.
Sharpening
On the other hand, sharpening your knife with a knife sharpener literally trims the surface of your kitchen knife. In effect, using a knife sharpener makes a new edge and point that is sharper to use.
Every knife sharpener is somewhat different. Some are even electric. However, with all knife sharpeners, the end goal is the same. Most knife sharpeners at Briscoes can be used for nearly all kitchen knives in NZ, and most are not electric. For that reason, we’ll explain how to use a regular non-electric knife sharpener. This step-by-step guide also assumes that your knife needs extensive sharpening, not just a touch-up.
To start with, you’ll want to set up your knife sharpener. With most knife sharpeners, especially the ones at Briscoes, you should put your knife sharpener secularly on a flat, dry surface at a comfortable height. A kitchen bench or dining table can be good.
Brace yourself for this next step! To do this, you’ll want to hold your knife sharpener with your non-dominant hand. A firm grip is essential so you don’t slip at any moment and cause an accident.
Most knife sharpeners have both a course and fine grit slot. If yours does, you’ll want to use the coarse slot first to do the bulk of the leg work. Place your knife closest to its heel (bottom of the blade) into this slot. Then, pull the knife towards you while slightly applying pressure. Your knife should be pointing away from you. You’ll need to pull smoothly, with each pull no longer than a few seconds. Do this at least five times until the burr (curved lip at the point) is raised.
Now, rinse and repeat. Not literally, but instead, carry out the same process you did with the coarse slot in the fine grit slot. Each slot on your knife sharpener should be obvious, given the groove's size and texture.
Just like you would any other time using your knife, give it a good clean. Cleaning will help to remove any shavings that may have been left behind during the sharpening process. There are plenty of other expert knife tips available online, otherwise, view our range of cleaning supplies that may come in handy with this step. Now you’re Japanese kitchen knives, chef’s knives or paring knives should be sharp and ready to go.
Top tip: A sharp tip is not the only way to create amazing food. Read our guide on how to season a cast iron pan for other kitchen advice.
You may have seen big Hollywood movies featuring chefs using a large metal rod to seemingly sharpen their knives before using them. What they’ll actually be doing is using a honing rod for honing. Sometimes known as a sharpening steel, there are several ways to use a honing rod. This technique is our top pick.
First up, when honing your kitchen knife, you’ll want to grip your honing rod with your non-dominant hand at a 90-degree angle. That way, the tip of the honing rod should be pushing down onto a surface that’s at a comfortable height. A coffee table may be suitable for this.
With your other hand, grab your knife’s handle with a firm grip so you don’t accidentally drop it. If you drop your knife, you may end up causing a nasty cut or accident.
Top tip: If you do accidentally cut yourself, it’s vital to follow first aid best practices.
Next up, it’s time to get honing. Applying light pressure, you’ll want to slide your blade across your honing rod at about a 15-degree angle. Similarly to using a knife sharpener, start at the heel (bottom of the blade) and pull it towards yourself. The point of your knife should obviously be pointed away from you. Use a sweeping motion and ensure that it’s always the middle of the blade that’s in contact with the honing rod. It’s best practice to work on each side of the knife, one at a time. This way, your kitchen knife should be honed nicely and evenly. Repeat the process so that each side is worked at least five times.
Just like after you’ve sharpened your knife, finish by cleaning it. Once again, this is to ensure that there are no micro shavings left behind on the blade's surface. Metal shavings won’t taste very nice in your next meal! Check out our range of cleaning supplies to help with washing up in the kitchen.

We have many options if you’re looking for a new knife sharpener. Choose from small knife sharpeners in various colours, three-stage knife sharpeners, sharpening steels (honing rods) and more. Our wide variety means that you can choose based on your preferences, including:
You can confidently shop our range of knife accessories and kitchen knives in NZ, including knife sharpeners, online. Make the most of our famous price promise and fast delivery. Choose from leading suppliers of knife sharpeners, including:
If you’re experiencing trouble with your kitchen knife, chances are it may need to be sharpened or honed. Sharpening your knife isn’t rocket science, but it does take a quality knife sharpener or honing rod. View our range of knives, knife sharpeners and knife blocks online or at your local Briscoes store. Be sure also to check out our range of Japanese kitchen knives (Santoku knives) and our handy guide that answers the question:s what is a Santoku knife and why you need one?
SIGN UP AND GET $10 OFF YOUR FIRST ORDER OVER $100*
Oops! Looks like you're already signed up for our emails. If you are having trouble receiving emails, contact us at contact@briscoes.co.nz
Thank you for subscribing to the Briscoes Club! Please check your inbox shortly
Thank you for subscribing to the Briscoes Club! Please check your inbox shortly
![]()
![]()
![]()
![]()
![]()

![]()